Introduction
Nowadays, the biggest challenge for an iOS developer is the craft of a robust application which must be easy to maintain, test and scale.
In this article you will learn a reliable approach to achieve it.
First of all, you need a brief introduction of what you’re going to learn: Architectural Patterns.
Architectural Patterns
What is it?
An architectural pattern is a general, reusable solution to a commonly occurring problem in software architecture within a given context. Architectural patterns are similar to software design pattern but have a broader scope. The architectural patterns address various issues in software engineering, such as computer hardware performance limitations, high availability and minimization of a business risk. Some architectural patterns have been implemented within software frameworks.
Cit. Wikipedia
When you start a new project or feature, you should spend some time thinking to the architectural pattern to use. With a good analysis, you may avoid spending days on refactoring because of a messy codebase.
Main Patterns
There are several architectural patterns available and you can use more than one in your project, since each one can suit better a specific scenario.
When you read about these kind of patterns you come across mainly with:
Model-View-Controller
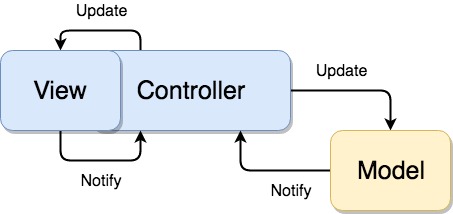
This is the most common and you might have used it since your first iOS project. Unfortunately, it’s also the worst because the Controller
has to manage every dependencies (API, Database and so on), contains the business logic of your application and is tightly coupled with UIKit
—it means that it’s very difficult to test.
You should usually avoid this pattern and replace it with the next ones.
Model-View-Presenter
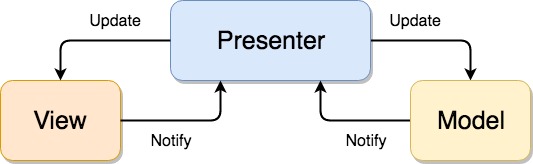
It’s one of the first alternatives to MVC and is a good attempt to decouple the Controller
and the View
.
With MVP you have a new layer called Presenter
which contains the business logic. The View
—your UIViewController
and any UIKit
components—is a dumb object, which is updated by the Presenter
and has the responsibility to notify the Presenter
when an UI event is fired. Since the Presenter
doesn’t have any UIKit
references, it is very easy to test.
Viper
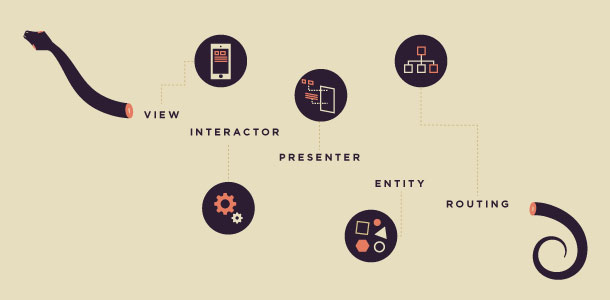
It’s is the representation of Clean Architecture of Uncle Bob.
The power of this pattern is the properly distribution of the responsibilities in different layers. In this way you have little layers easy to test and with a single responsibility. The problem with this pattern is that it may be overkilling in the most of the scenarios since you have a lot of layers to manage and it may be confusing and difficult to manage.
This pattern is not easy to master, you can find further details about this architectural pattern in this article.
Model-View-ViewModel
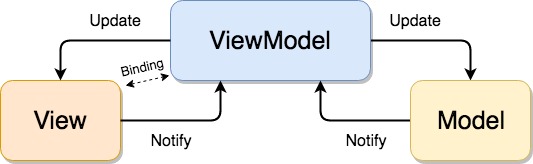
Last but not least, MVVM is very similar to MVP since the layers are pretty much the same. You can consider MVVM a MVP version improved thanks to the UI Binding.
UI Binding is a bridge between the View
and ViewModel
—mono or bidirectional—and lets communicate these two layers in a completely transparent way.
Unfortunately, iOS doesn’t have a native way to achieve it, so you must use third-party libraries/frameworks or make it by yourself.
There are different ways to get an UI Binding with Swift:
RxSwift (or ReactiveCocoa)
RxSwift is the Swift version of the family ReactiveX—once you master it, you are able to switch easily to RxJava, RxJavascript and so on.
This framework allows you to write functional reactive programming (FRP) and thanks to the internal library RxCocoa you are able to bind View
and ViewModel
easily:
class ViewController: UIViewController {
@IBOutlet private weak var userLabel: UILabel!
private let viewModel: ViewModel
private let disposeBag: DisposeBag
private func bindToViewModel() {
viewModel.myProperty
.drive(userLabel.rx.text)
.disposed(by: disposeBag)
}
}
I will not explain how to use RxSwift thoroughly since it would be beyond the goal of this article—it would deserve an own article to be explained properly.
FRP lets you learn a new way to develop and you may start either loving or hating it. If you are not used to FRP development, you have to spend several hours before getting used and understanding how to use it properly since it is a completely different concept of programming.
An alternative framework to RxSwift is ReactiveCocoa. Check this article if you want to understand the main differences.
Delegation
If you want to avoid importing and learning new frameworks you could use the delegation as an alternative. Unfortunately, using this approach you lose the power of a transparent binding since you have to make the binding manually. This version of MVVM becomes very similar to MVP.
The strategy of this approach is keeping a reference of the delegate—implemented by the View
—inside your ViewModel
. In this way the ViewModel
can update the View
, without having references of UIKit
objects.
Here an example:
class ViewController: UIViewController, ViewModelDelegate {
@IBOutlet private weak var userLabel: UILabel?
private let viewModel: ViewModel
init(viewModel: ViewModel) {
self.viewModel = viewModel
super.init(nibName: nil, bundle: nil)
viewModel.delegate = self
}
required init?(coder aDecoder: NSCoder) {
fatalError("init(coder:) has not been implemented")
}
func userNameDidChange(text: String) {
userLabel?.text = text
}
}
protocol ViewModelDelegate: class {
func userNameDidChange(text: String)
}
class ViewModel {
private var userName: String {
didSet {
delegate?.userNameDidChange(text: userName)
}
}
weak var delegate: ViewModelDelegate? {
didSet {
delegate?.userNameDidChange(text: userName)
}
}
init() {
userName = "I 💚 hardcoded values"
}
}
Closures
It’s very similar to the delegation but instead of using a delegate you use the closures.
The closures are ViewModel
properties and the View
uses them to update the UI. You must pay attention to avoid retain cycles in the closures using [weak self]
.
You can read this article about retain cycles because of Swift closures.
Here an example:
class ViewController: UIViewController {
@IBOutlet private weak var userLabel: UILabel?
private let viewModel: ViewModel
init(viewModel: ViewModel) {
self.viewModel = viewModel
super.init(nibName: nil, bundle: nil)
viewModel.userNameDidChange = { [weak self] (text: String) in
self?.userNameDidChange(text: text)
}
}
required init?(coder aDecoder: NSCoder) {
fatalError("init(coder:) has not been implemented")
}
func userNameDidChange(text: String) {
userLabel?.text = text
}
}
class ViewModel {
var userNameDidChange: ((String) -> Void)? {
didSet {
userNameDidChange?(userName)
}
}
private var userName: String {
didSet {
userNameDidChange?(userName)
}
}
init() {
userName = "I 💚 hardcoded values"
}
}
The Pick: MVVM-C
When you have to choose an architectural pattern, you have the challenge to understand which one suits better your needs. Among these patterns, MVVM is one of the best choices since it’s very powerful and easy to use at the same time.
Unfortunately this pattern is not perfect, the main lack of MVVM is the routing management.
We have to add a new layer to get the power of MVVM and routing in the same patterns. It becomes: Model-View-ViewModel-Coordinator (MVVM-C)
The sample project will show how the Coordinator
works and how to manage the different layers.
Getting Started
You can download the project source here.
The examples are simplified to keep the focus on how MVVM-C works, therefore the classes on Github may be slightly different.
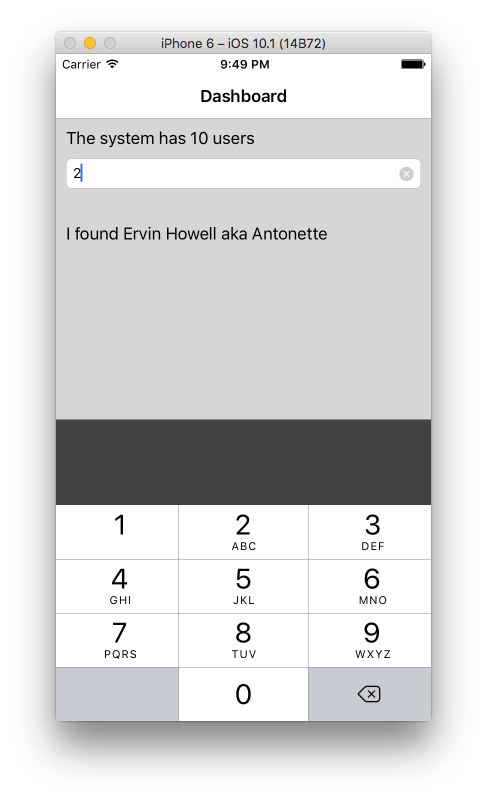
The sample app is a plain dashboard app which fetches the data from a public API and, once the data is ready, allows the user to find an entity by id, like in the screenshot below:
This application has different ways to add the view controller so you’ll see how to use the Coordinator
in edge cases with child view controllers.
MVVM-C Layers
Coordinator
Its responsibility is to show a new view and to inject the dependencies which the View
and ViewModel
need.
The Coordinator
must provide a start
method to create the MVVM layers and add View
in the view hierarchy.
You may often have a list of Coordinator
childs since in your current view you may have subviews like in our example:
final class DashboardContainerCoordinator: Coordinator {
private var childCoordinators = [Coordinator]()
private weak var dashboardContainerViewController: DashboardContainerViewController?
private weak var navigationController: UINavigationControllerType?
private let disposeBag = DisposeBag()
init(navigationController: UINavigationControllerType) {
self.navigationController = navigationController
}
func start() {
guard let navigationController = navigationController else { return }
let viewModel = DashboardContainerViewModel()
let container = DashboardContainerViewController(viewModel: viewModel)
bindShouldLoadWidget(from: viewModel)
navigationController.pushViewController(container, animated: true)
dashboardContainerViewController = container
}
private func bindShouldLoadWidget(from viewModel: DashboardContainerViewModel) {
viewModel.rx_shouldLoadWidget.asObservable()
.subscribe(onNext: { [weak self] in
self?.loadWidgets()
})
.addDisposableTo(disposeBag)
}
func loadWidgets() {
guard let containerViewController = usersContainerViewController() else { return }
let coordinator = UsersCoordinator(containerViewController: containerViewController)
coordinator.start()
childCoordinators.append(coordinator)
}
private func usersContainerViewController() -> ContainerViewController? {
guard let dashboardContainerViewController = dashboardContainerViewController else { return nil }
return ContainerViewController(parentViewController: dashboardContainerViewController,
containerView: dashboardContainerViewController.usersContainerView)
}
}
You can notice that the Coordinator
has a parent UIViewController
object—or subclasses like UINavigationController
—injected in the constructor. Since the Coordinator
has the responsibility to add the View
in the view hierarchy, it must know in which parent add the View
.
In the example above, DashboardContainerCoordinator
implements the protocol Coordinator
:
protocol Coordinator {
func start()
}
which allows you to take advantage of Polymorphism.
Once you create your first Coordinator
you must add it as entry point of your application in the AppDelegate
:
class AppDelegate: UIResponder, UIApplicationDelegate {
var window: UIWindow?
private let navigationController: UINavigationController = {
let navigationController = UINavigationController()
navigationController.navigationBar.isTranslucent = false
return navigationController
}()
private var mainCoordinator: DashboardContainerCoordinator?
func application(_ application: UIApplication, didFinishLaunchingWithOptions launchOptions: [UIApplicationLaunchOptionsKey: Any]?) -> Bool {
window = UIWindow()
window?.rootViewController = navigationController
let coordinator = DashboardContainerCoordinator(navigationController: navigationController)
coordinator.start()
window?.makeKeyAndVisible()
mainCoordinator = coordinator
return true
}
}
In AppDelegate
we instantiate a new DashboardContainerCoordinator
and thanks to the method start
we push the new view in navigationController
.
You can see on the Github project how to inject a UINavigationController
type decoupling UIKit
and the Coordinator
.
Model
The Model
is a dumb representation of the data. It must be as plain as possible without business logic.
struct UserModel: Mappable {
private(set) var id: Int?
private(set) var name: String?
private(set) var username: String?
init(id: Int?, name: String?, username: String?) {
self.id = id
self.name = name
self.username = username
}
init?(map: Map) { }
mutating func mapping(map: Map) {
id <- map["id"]
name <- map["name"]
username <- map["username"]
}
}
The sample project uses the open source framework ObjectMapper to transform the JSON to an object.
ObjectMapper is a framework written in Swift that makes it easy for you to convert your model objects (classes and structs) to and from JSON.
It’s very useful when you have a JSON response from an API and you must create your model objects parsing the JSON string.
View
The View
is a UIKit
object—like a common UIViewController
.
It usually has a reference of the ViewModel
—which is injected by the Coordinator
—to create the bindings.
final class DashboardContainerViewController: UIViewController {
let disposeBag = DisposeBag()
private(set) var viewModel: DashboardContainerViewModelType
init(viewModel: DashboardContainerViewModelType) {
self.viewModel = viewModel
super.init(nibName: nil, bundle: nil)
configure(viewModel: viewModel)
}
required init?(coder aDecoder: NSCoder) {
fatalError("init(coder:) has not been implemented")
}
func configure(viewModel: DashboardContainerViewModelType) {
viewModel.bindViewDidLoad(rx.viewDidLoad)
viewModel.rx_title
.drive(rx.title)
.addDisposableTo(disposeBag)
}
}
In this example the title of the view controller is bound to the property rx_title
of the ViewModel
. In this way when the ViewModel
updates rx_title
then the title of the view controller will be automatically updated with the new value.
ViewModel
The ViewModel
is the core layer of this architectural pattern. It has the responsibility to keep the View
and Model
updated. Since the business logic is inside this class, you should use different components with single responsibilities to keep the ViewModel
as clean as possible.
final class UsersViewModel {
private var dataProvider: UsersDataProvider
private var rx_usersFetched: Observable<[UserModel]>
lazy var rx_usersCountInfo: Driver<String> = {
return UsersViewModel.createUsersCountInfo(from: self.rx_usersFetched)
}()
var rx_userFound: Driver<String> = .never()
init(dataProvider: UsersDataProvider) {
self.dataProvider = dataProvider
rx_usersFetched = dataProvider.fetchData(endpoint: "http://jsonplaceholder.typicode.com/users")
.shareReplay(1)
}
private static func createUsersCountInfo(from usersFetched: Observable<[UserModel]>) -> Driver<String> {
return usersFetched
.flatMapLatest { users -> Observable<String> in
return .just("The system has \(users.count) users")
}
.asDriver(onErrorJustReturn: "")
}
}
In this example the ViewModel
has a data provider injected in the constructor which is used to fetch the data from a public API. Once the data provider returns the data fetched, the ViewModel
emitting a new event by rx_usersCountInfo
with the new count of users. This new event is sent to the View
thanks to the binding which observes rx_usersCountInfo
and update the UI.
You may have multiple components inside your ViewModel
like a data controller for your database (CoreData, Realm and so on), a data provider which interacts with your API and any other external dependencies.
The ViewModel
s use RxSwift so when the type of property is a RxSwift class (Driver
, Observable
and so on) there is a rx_
prefix. It’s not mandatory but it can help you to understand which properties are RxSwift objects.
Conclusions
MVVM-C has a lot of advantages and it can improve the quality of your application. You should pay attention on which approach to use for the UI Binding since RxSwift is not easy to master, furthermore the debugging and testing may sometimes be a little bit tricky if you don’t know well what are you doing.
My suggestion is to start using this architectural pattern a little at a time so you can get used of the different layers and how to keep the responsibilities well isolated and easy to test.
FAQ
Does MVVM-C have some limitations?
Yes, of course. If you’re working in a complex project you may have some edge-cases where MVVM-C may be impossible to use—or some little features where this pattern is overkilling. If you start using MVVM-C it doesn’t mean that you are forced to use it everywhere, you should always use the architectural pattern which suits better your needs.
Can I use both functional and imperative programming with RxSwift?
Yes, you can. But I’d suggest keeping imperative approaches just in the legacy code and using functional programming for the new implementations, in this way you can take advantage of the power of RxSwift. If you want to use RxSwift just for your UI Binding you can easily write imperative programming and use reactive functional programming just to set the binding.
Can I use RxSwift in an enterprise project?
It depends if you are going to start your project or if you have to maintain legacy code. In a project with legacy code you may struggle to use RxSwift and you should refactor a lot of classes. I’d suggest starting a little at a time with little classes if you have the time and the resources to do it—otherwise try using other alternatives for the UI Binding.
An important thing to consider is that at the end of the day RxSwift is another dependency to add to your project and you can risk to waste time because of RxSwift breaking changes or lack of documentation for what you want to achieve in edge-cases.
09/03/2018 at 15:33
Hi, thanks for the article! One thing I don’t see you implement is the chain of flow in a coordinator through a series of view controllers or view models. How does one view controller or view model signal that it’s done to the coordinator, pass any data back to the coordinator that’s needed for the next view controller/view model, and how does the coordinator present the next step in the flow?
11/03/2018 at 14:32
Hi Evan, I usual let communicate the view model and the coordinator through a closure or delegate. In this way, view model can notify the coordinator that something happened. Then, the coordinator will notify the parent coordinator to remove itself from the hierarchy.
07/09/2017 at 08:52
Hi Marco Santarossa,
Thanks for the article,
I have a question, why we use coredata..or …which type of application.
while sqlite
07/09/2017 at 12:54
Hey Rahul! Are you asking when to use CoreData and when sqlLite? I think we should use CoreData most of the time since it’s an high-level interface to manage the persistency.
29/03/2017 at 03:32
Good article, reminded me of Khanlou’s video when he first introduced coordinator s
. It’s really easy to handle controller push on navigation, how are you handling navigation pop by gesture/back? Clearing coordinators when view stack is cleared?
29/03/2017 at 08:06
Hi Pushpak,
I’m glad you like the article.
I usually don’t care of the pop since the objects will be destroyed automatically if you have a right management of the retain count. If I have something to compute when the view controller is popped then my Coordinator implements
UINavigationControllerDelegate
.27/03/2017 at 16:32
Hi Marco,
Thanks for the great article! Nice recap on the different patterns you might want to use or try out.
What do you think about just using the plain MVVM pattern and create and inject the ViewModel inside the prepareForSegue function inside the ViewController? That’s the way I’m used to use MVVM and I just let the navigation stack handle the view hierarchy.
27/03/2017 at 16:58
Hi Jussi,
I’m glad you like the article.
Personally, I don’t like using the
prepareForSegue
because your View shouldn’t have the responsibility to create the MVVM stack for the next component you are going to push in your view hierarchy. InprepareForSegue
you add business logic which the View shouldn’t know about, since it must be a dumb component which shows the data received by the ViewModel. Moreover, your component is not reusable since in itsprepareForSegue
creates a new component stack. If the flow of your app changes you have to change the code of yourprepareForSegue
, instead with the Coordinator you should just swap two Coordinators.Does it make sense to you? Feel free to add your thoughts—like the reason you prefer your approach—it can help me to understand your point of view.
27/03/2017 at 19:42
I haven’t used the Coordinator pattern my self so I have to give it a bit more thought. Maybe I am not seeing all the benefits at first glance and I am too stuck with my comfortable MVVM-pattern 🙂
I agree the view should be as dumb as possible with no business logic. But before reading this article, I considered the prepareForSegue, and the view model creation inside it, just a normal way of handling view transitions, passing data between different views and view stack handling in iOS.
Lets say you have a UITableView which contains bunch of cells that has their own view models. User taps a cell and you launch a segue to transition to the next view. Inside the prepare for segue you get the correct view model from an array which contains all the view models for the cells(including the model object it was created from), create the next view model and pass it on to the destination view controller (and now that I think of it, it would be also easy to move the new views view model creation inside the current views view model).
If the flow changes the code will anyway need some refactoring and then I’ll just move data passing and view model creation to match the new flow. About the reusability, I am so used to handle the view transitions with segue so I don’t see how it is not reusable? If the view needs some data from the previous view it will anyway need a way to pass it. If I need to launch it from another point inside the app, I can always create the view model and pass it.
But as said, I really liked the article and it gave me some new thoughts. I think I have to play around a little bit with your github example. And please share your thoughts if something popped up from what I just wrote! 🙂
27/03/2017 at 20:04
To understand the power of MVVM-C try managing your flow without Storyboards. I know, I may seem crazy because Storyboards have a lot of useful things to manage the flows of your app. The problem with Storyboard—just a personal opinion—is that you risk coupling too much the current and the new view to show.
For the example with the cell tapped: you could notify the current Coordinator—which shows the table—that a cell has been tapped, then the current Coordinator has the responsibility to create the stack of the component of the next view. If you show a new MVVM stack inside your table view controller then it has to know the business logic of what happens if a cell is tapped.
For the reusability of the component, if you have a component A which in the
prepareForSegue
instantiate a component B then you cannot use the component A in another scenario/project without having the component B to show inprepareForSegue
. Instead, with MVVM-C you can have the component A which don’t need internal changes if moved in another scenario/project.Anyway I understand your point because MVVM with Storyboard works like you describe. Indeed, Coordinator is an useful layer to move the app routing outside your View.
If you want to continue this discussion feel free to use the form at https://marcosantadev.com/contact-me/ . I’ll reply you privately asap.
24/03/2017 at 21:54
Hi Marco, thx for the article 💪 🙂
I have a question, when & how do you remove a cordinator from childCoordinators? I had some problems with making a protocol equatable
24/03/2017 at 23:56
Hi, I’m glad you like the article.
An easy approach is adding a tag to your child coordinators. Once you have to delete a specific
Coordinator
you can use a method like:Is it possible in your implementation?
25/03/2017 at 10:49
Maybe maybe ;). Currently I don’t have a project where I use coordinators. Legacy code. I need to refactor it first 😉
I also was thinking about making
Coordinator
a class (not a protocol) so then you maybe can implement Equatable as===
25/03/2017 at 11:40
If you want to compare solely two
Coordinator
instances you don’t need theEquatable
protocol because===
checks if two objects refer to the same instance. With this approach you need to keep a reference ofCoordinator
you want to delete—and you have already a reference of that object kept by the arraychildCoordinators
. Personally I don’t like so much it because you have to compare every instances to find the right one to delete, using a tag it’s far faster. Moreover with the tag approach you can keepCoordinator
as a protocol which is an important thing since you can avoid inheritance. If you have more doubts or if you feel that the tag approach is not a good idea we can discuss privately. Please send me an e-mail with theContact Me
form and I’ll reply asap.