Should you read this article?
This article is about a new software architecture which has more layers than VIPER and MVVM-C. It means that it may be more complex than other known architectures.
If you want to continue reading this article, you must accept my point of view that if we want a clean and testable architecture we should have several layers with just a responsibility.
I don’t want to sell it as the perfect architecture which can solve all your problems. It may not suit your needs perfectly. For this reason, I would suggest you to read this article thoroughly and judge by yourself if this architecture makes sense for your projects.
If you are wondering why MVC is not enough for iOS development, I would suggest you to jump in Why MVC is not enough.
Introduction
I created this blog writing an article about MVVM-C. Then, I wrote an article about SOLID principles. At this point, you may be thinking that I don’t practice what I preach. If I speak about “Single Responsibility Principle”, why do I want to use MVVM-C even if the Coordinator
layer has more than one responsibility? It creates the stack (View Model
, View
and Service
), adds View
in a parent UIKit
component and decides the routing adding/removing child coordinators. MVVM-C must be refactored a little bit to avoid breaking “Single Responsibility Principle”.
In this article, I will explain an alternative to the main iOS software architectures: 4V Engine.
Happy Reading!
Contents
Why MVC is not enough
I’ve already covered this point in a my previous article about MVVM-C but I want to write it again because I think it’s very important.
A common approach to become an iOS developer is looking at the documentation and following the patterns suggested by Apple to write some plain projects. It means that the majority of us have begun using MVC as software architecture to create our first applications. Step by step, we started to get used to MVC. At this point of the learning process, we think that MVC is the right way. It works, why should we move to another architecture which adds complexity to our code?
There are, mainly, two reasons:
- SOLID principles: The view controller has too many responsibilities.
- Testability: The view controller is difficult to test since it’s tightly coupled with
UIKit
.
If we want to solve the points above, we should move to another architecture. Unfortunately, nothing comes for free. This change has a cost: complexity. If we look at VIPER and MVVM-C, we can notice that there are several layers to manage and let communicate together. It may be overkilling if we have a plain application or we don’t really care of SOLID and testability.
My personal point of view is:
I like having a well-written code which follows the SOLID principles and properly tested to avoid bugs as much as possible. For this reason, I wanted to spend time and efforts to create a new clean software architecture.
Problems of MVVM-C
As said previously, MVVM-C is not enough. The Coordinator
layer breaks “Single Responsibility Principle” and must be split in three components with the following responsibilities:
- Manage the app routing.
- Create the stack (
View Model
,View
andService
). - Show
View
in a parentUIKit
component.
This idea of splitting the Coordinator
led me to 4V Engine.
I want to thank my friend Ennio Masi for pointing out this Coordinator
problem, which motivated me to find a solution.
Problems of VIPER
Another famous iOS architecture is VIPER. It has several layers which are very similar to MVVM-C with a different naming.
If we analyze VIPER, we can find the same problem of MVVM-C. The guilty layer is called Wireframe
and it’s the router of the architecture.
Let’s use, for the sake of the explanation, the following code copied from VIPER-SWIFT:
1 2 3 4 5 6 7 8 9 10 11 12 13 14 15 16 17 18 | class AddWireframe: NSObject, UIViewControllerTransitioningDelegate { var addPresenter : AddPresenter? var presentedViewController : UIViewController? func presentAddInterfaceFromViewController(_ viewController: UIViewController) { let newViewController = addViewController() newViewController.eventHandler = addPresenter newViewController.modalPresentationStyle = .custom newViewController.transitioningDelegate = self viewController.present(newViewController, animated: true, completion: nil) presentedViewController = newViewController } //..... |
We can notice that presentAddInterfaceFromViewController
has too many responsabilities:
- Manage the routing.
- Create the
View
and its properties. - Show
View
in the parentUIViewController
.
We can notice that—with these three points—we have the same problems of the MVVM-C Coordinator
.
4V Engine
We’ve analyzed the common iOS software architectures and we have found some problems. If we are willing developers and we want to improve our code, we would need an alternative which refactors the previous ones. With this goal in mind, I created this new software architecture:
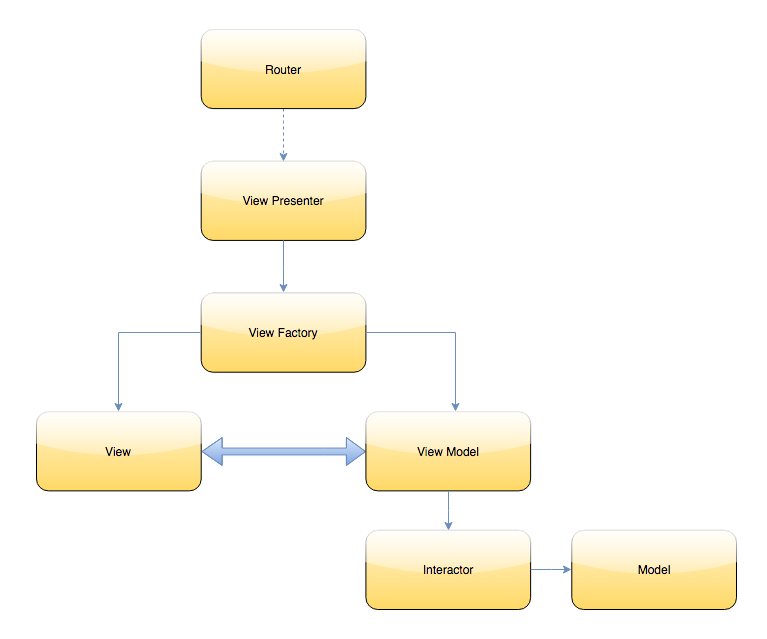
Don’t be afraid, it may be confusing but we are going through the explanation of each layer soon.
As we can see in the diagram above, the core of this architecture is made by View Presenter
, View Factory
, View
and View Model
, for this reason this architecture is called 4V Engine.
Getting Started
Now, it’s time to explain each single layer. Since I think that jumping in the code is the best way to learn something, we’ll use a sample app to cover each layer with an example.
You can find the Github repo here.
It’s a very plain application with two components:
- Users List: a users list fetched from a remote API.
- User Details: a view with the name of the user selected in the users list-we can select a user tapping the info button of a
UITableViewCell
in the users list.
Layers
I think the best way to explain the layers is starting from bottom (Model
) to top (Router
). Let’s start.
Model
The model represents the data of our application.
In our sample app, we have a model User
:
1 2 3 4 | struct User { let name: String } |
which represents the single user parsed from the API response.
Interactor
The Interactor
is the same used in VIPER.
This layer manages the Model
to prepare the data for the View Model
. The View Model
shouldn’t perform any operations directly on the model, but it should delegate Interactor
for any data manipulations.
In our sample app, we have an interactor which fetches the users from a remote API—thanks to the service HTTPClient
—and then transforms the JSON data received in an array of User
—thanks to the helper class UsersParser
—to be used inside our View Model
:
1 2 3 4 5 6 7 8 9 10 11 12 13 14 15 16 17 18 19 20 21 22 23 24 25 26 27 28 | final class UsersListInteractor { private let httpClient: HTTPClientType init(httpClient: HTTPClientType = HTTPClient()) { self.httpClient = httpClient } func fetchUsers(completion: @escaping ([User]) -> Void) { guard let url = URL(string: "https://jsonplaceholder.typicode.com/users") else { completion([]) return } let httpCompletionHandler: (Data) -> Void = { data in guard let jsonData = (try? JSONSerialization.jsonObject(with: data, options: [])) as? [[String: Any]] else { completion([]) return } let users = UsersParser.parse(jsonData) completion(users) } httpClient.get(at: url, completionHandler: httpCompletionHandler) } } |
View Model
We can consider View Model
the most important layer of this architecture. Its responsibility is to interact with the UI to decide what to show and how to behave after an UI action.
This layer shouldn’t have any UIKit
references. If we want a communication between View
and View Model
, we should use an UI binding mechanism. I’ve already shown the main mechanisms in a my previous article. For this sample app, I’ve decided to avoid RxSwift for the binding since it would have increased the complexity of the examples. To keep everything as plain as possible, the binding has been achieved with the delegation pattern.
We can use View Model
with an its Interactor
to get the data to show in the UI, as we can see in the sample app:
1 2 3 4 5 6 7 8 9 10 11 12 13 14 15 16 17 18 19 20 21 22 23 24 25 26 27 28 29 30 31 32 33 34 35 36 37 38 39 40 41 42 43 44 45 46 47 48 49 50 51 52 53 54 55 56 57 58 59 60 61 | // Delegate used to bind the UI and the View Model protocol UsersListViewModelDelegate: class { func usersListUpdated() } final class UsersListViewModel { // Value used in View to know how many table rows to show var usersCount: Int { return users.count } private weak var delegate: UsersListViewModelDelegate? private weak var navigationDelegate: UsersListNavigationDelegate? private let usersListInteractor: UsersListInteractor private var users = [User]() init(usersListInteractor: UsersListInteractor, navigationDelegate: UsersListNavigationDelegate) { self.navigationDelegate = navigationDelegate self.usersListInteractor = usersListInteractor loadUsers() } // Asks the interactor the list of users to show in the UI private func loadUsers() { usersListInteractor.fetchUsers { [unowned self] users in self.users = users DispatchQueue.main.async { // Method used to ask the View to update the table view with the new data self.delegate?.usersListUpdated() } } } private func user(at indexPath: IndexPath) -> User { return users[indexPath.row] } // Sets the delegate to bind the UI func bind(_ delegate: UsersListViewModelDelegate) { self.delegate = delegate } // Method used in View to know which user name to show in the cell func userName(at indexPath: IndexPath) -> String { let user = self.user(at: indexPath) return user.name } // Method called in View when the user taps a cell detail button func userDetailsSelected(at indexPath: IndexPath) { let user = self.user(at: indexPath) // Method used to notify the router that a user has been selected navigationDelegate?.usersListSelected(for: user) } } |
With MVC, we are used to keep the business logic inside the view controller. With 4V Engine, we can move the business logic inside the View Model
and test it easily since we don’t have dependencies with UIKit
.
Note:
navigationDelegate
is used to communicate withRouter
. We’ll see it in Router.- The method
bind
is used for the UI binding betweenView
andView Model
. We’ll see it in View.
View
The View
layer represents any UIKit
components used to show something in the device screen.
In the sample app, the View
is a UIViewController
for the user details and a UITableViewController
for the users list.
The advantage of a good architecture is that we can test easily our layers. View
is usually the most difficult to test because it’s coupled with its dependency UIKit
. For this reason, we must keep this layer as plain as possible and move the business logic in a testable layer. The “testable” layer is the View Model
. As we’ve seen in View Model, the UI data is driven by the View Model
. In this way, we can move the business logic inside View Model
. View
becomes a dumb layer, which is used merely to show something in the device screen.
The important concept to understand with the View
is the UI binding, which allows us to set the communication between View Model
and View
. If you don’t know what is the UI Binding, please have a look at my previous article.
Here an example of View
from the sample app:
1 2 3 4 5 6 7 8 9 10 11 12 13 14 15 16 17 18 19 20 21 22 23 24 25 26 27 28 29 30 31 32 33 34 35 36 37 38 39 40 41 42 43 44 45 46 47 48 49 50 51 52 | class UsersListTableViewController: UITableViewController { // The view model used for the binding private unowned let viewModel: UsersListViewModel init(viewModel: UsersListViewModel) { self.viewModel = viewModel super.init(nibName: nil, bundle: nil) } required init?(coder aDecoder: NSCoder) { fatalError("init(coder:) has not been implemented") } override func viewDidLoad() { super.viewDidLoad() let nib = UINib.init(nibName: "UsersListTableViewCell", bundle: nil) tableView.register(nib, forCellReuseIdentifier: "Cell") // Binds View and View Model viewModel.bind(self) } // MARK: - Table view data source override func tableView(_ tableView: UITableView, numberOfRowsInSection section: Int) -> Int { // Asks the View Model how many users are available return viewModel.usersCount } override func tableView(_ tableView: UITableView, cellForRowAt indexPath: IndexPath) -> UITableViewCell { let cell = tableView.dequeueReusableCell(withIdentifier: "Cell", for: indexPath) // If it's the custom cell, configure it if let usersListCell = cell as? UsersListTableViewCell { // Asks the View Model the user name for a specific index path let userName = viewModel.userName(at: indexPath) // Sets the user name usersListCell.configure(userName: userName) } return cell } override func tableView(_ tableView: UITableView, accessoryButtonTappedForRowWith indexPath: IndexPath) { // Notifies the View Model that a detail button has been tapped viewModel.userDetailsSelected(at: indexPath) } } |
As we can see in this example, the UI binding is often bidirectional, some times we ask some data to View Model
and some times we get notified by View Model
to update the UI—like with usersListUpdated
.
Note:
The property viewModel
has the keyword unowned
. It’s required to avoid a retain cycle. Since View Factory
already keeps a strong reference of View Model
—as we’ll see in View Factory—View
doesn’t need to keep a strong reference of its View Model
.
View Factory
So far, the layers have been very similar to VIPER and MVVM-C. Now, it’s time to explain the layers which may be confusing at first glance.
The responsibility of View Factory
is creating the core of the architecture: View
, View Model
and Interactor
.
View Factory
alone may not make a lot of sense, we must see it in the right context. We’ll understand its usage in View Presenter.
Let’s see an example from the sample app:
1 2 3 4 5 6 7 8 9 10 11 12 | final class UsersListViewFactory { let viewController: UsersListTableViewController private let viewModel: UsersListViewModel init(navigationDelegate: UsersListNavigationDelegate) { let interactor = UsersListInteractor() viewModel = UsersListViewModel(usersListInteractor: interactor, navigationDelegate: navigationDelegate) viewController = UsersListTableViewController(viewModel: viewModel) } } |
Note:
- We are exposing
viewController
to be used inView Presenter
. We may also expose theView Model
for specific reasons. I think it can be private most of the time. The decision depends on what you have to achieve. - We are injecting
UsersListNavigationDelegate
inUsersListViewModel
to let theRouter
communicate with theView Model
in an abstract way. We’ll see the details of this delegate in Router.
View Presenter
The name of this layer may be a little bit confusing. We’re used to call Presenter
the layer which updates the View
—we have this layer in VIPER and MVP. In this architecture, the presenter is called View Model
and this layer is not a presenter but a View presenter. Keep reading to understand its responsibility.
The View Presenter
is the last piece of the puzzle of a component written with 4V Engine.
This layer has the responsibility to show the component in the device screen.
To achieve this goal, it must know what and where to show. The View
to add is provided by the View Factory
and the parent is injected from outside.
Let’s see an example from the sample app:
1 2 3 4 5 6 7 8 9 10 11 12 13 14 15 16 17 18 19 20 21 22 23 | final class UsersListViewPresenter: ViewPresenter { private let viewFactory: UsersListViewFactory init(navigationDelegate: UsersListNavigationDelegate) { viewFactory = UsersListViewFactory(navigationDelegate: navigationDelegate) } // Method to add the component in a parent view controller func present(in parentViewController: UIViewController) { // Method of UIViewControllerExtension.swift to add a child view controller filling the parent view with // autolayout. // Look at UIViewControllerExtension.swift for more details parentViewController.addFillerChildViewController(viewFactory.viewController) } // Method to remove the component from the device screen func remove() { viewFactory.viewController.view.removeFromSuperview() viewFactory.viewController.removeFromParentViewController() } } |
In this example, present()
is a very plain method to add a child view controller. If you have fancy UIViewController
transitions, this method is the right place to manage them.
You can notice that we are propagating UsersListNavigationDelegate
through the layers to use it in the View Model
. This is the downside of splitting the architecture in several layers.
Router
We’ve just finished to see the layers of a single component. At this point, we have a component almost ready to be shown in the screen. We need a last step: to decide when to show the component. This is the responsibility of Router
.
We usually have a Router
per story. In this context, my definition of story is:
The set of components which, together, define a flow in our application.
In our sample app, we have the story Users
which is the set of users list and user details together. Other stories can be:
- Onboarding: set of views to show how to use the application.
- Registration: set of views to create a new account, accept terms of use, validate email, …
- Items Purchase: set of views to show the basket, add delivery address, add card details for the payment, …
Let’s see how to use Router
for the story Users
in the sample app:
1 2 3 4 5 6 7 8 9 10 11 12 13 14 15 16 17 18 19 20 21 22 23 24 25 26 27 28 29 30 31 32 33 34 35 36 37 38 39 40 41 42 43 44 45 46 47 48 49 50 51 52 53 54 55 56 57 58 59 60 61 62 63 | // Delegate used to navigate from users list to user details protocol UsersListNavigationDelegate: class { func usersListSelected(for user: User) } // Delegate used to close the user details protocol UserDetailsNavigationDelegate: class { func userDetailsCloseDidTap() } final class UsersRouter { // Parent view controller to add the components fileprivate let parentViewController: UIViewController // Dictionary of presenters used fileprivate var presenters = [String: ViewPresenter]() init(parentViewController: UIViewController) { self.parentViewController = parentViewController } } extension UsersRouter: Router { // Shows first component, the users list func showInitial() { let usersListPresenter = UsersListViewPresenter(navigationDelegate: self) usersListPresenter.present(in: parentViewController) presenters["UsersList"] = usersListPresenter } // Closes the router removing all its components func close() { presenters.keys.forEach { [unowned self] in self.removePresenter(for: $0) } } fileprivate func removePresenter(for key: String) { let userDetailsPresenter = presenters[key] userDetailsPresenter?.remove() presenters[key] = nil } } extension UsersRouter: UsersListNavigationDelegate { func usersListSelected(for user: User) { let userDetailsPresenter = UserDetailsViewPresenter(user: user, navigationDelegate: self) userDetailsPresenter.present(in: parentViewController) presenters["UserDetails"] = userDetailsPresenter } } extension UsersRouter: UserDetailsNavigationDelegate { func userDetailsCloseDidTap() { // Removes user details components from the parent view controller removePresenter(for: "UserDetails") } } |
Note:
Router
has a dictionary with the presenters used. In this way, if we want to remove a component like inuserDetailsCloseDidTap
, we can easily get the right presenter using a key.
We can have a look at AppDelegate
to understand how to use the router:
1 2 3 4 5 6 7 8 9 10 11 12 13 14 15 16 17 18 19 20 21 22 23 24 | @UIApplicationMain class AppDelegate: UIResponder, UIApplicationDelegate { var window: UIWindow? var usersRouter: Router? func application(_ application: UIApplication, didFinishLaunchingWithOptions launchOptions: [UIApplicationLaunchOptionsKey: Any]?) -> Bool { let rootViewController = UIViewController() window = UIWindow() window?.rootViewController = rootViewController let usersRouter = UsersRouter(parentViewController: rootViewController) usersRouter.showInitial() window?.makeKeyAndVisible() self.usersRouter = usersRouter return true } } |
Conclusion
I consider this article a presentation of the version 1.0.0
of 4V Engine. I changed it a lot of time and I’m sure that there is still room of improvement. For this reason, I would like some comments with your opinions, it would be greatly appreciated. Thank you.
03/02/2018 at 07:07
Quite interesting concept. One thing that I find a bit confusing is the naming of the view layer. I would still see view controllers and views in different layers with different responsibilities, and would rather avoid a naming that could be misleading.
11/03/2018 at 14:30
At the end of day, an architecture is just a process to give a name to specific layers, so I think you can use the name which you prefer. I’m sure that I can improve the names which I used 🙂
09/09/2017 at 10:17
Thanks for your sharing. From my point of view every architecture has it cons and pos, and simple example doesn’t cover them all. I should say that any architecture look nice on two screen application. How could this architecture handle multi purpose component screen interaction -> map + locations list on same screen, for example?
09/09/2017 at 10:29
Hello Kanstantsin, you’re right. An application with two views doesn’t cover all the scenarios and for sure there are a lot of edge-cases where this architecture may be tricky to use. But, I’m using it in a my side project which is more complex than the sample app and I am able to write it with a clean code. If you have multiple components in the same screen you can let communicate them through the Router using the navigation delegate.
09/09/2017 at 11:02
thank you for reply, I am using viper in one of my projects and found that it is very difficult to manage ui where was used side menu or some components could be visible only on special cases. Especial if I need some sort of animations based on constraints. I implemented some analog of yours view factory that prepare view controllers to conditions they should met in parent view – to handle difference between containment or navigation controller. Do you know an architecture I could use to build view components in this way more effective?
09/09/2017 at 15:51
An approach which I didn’t try yet is using redux: https://github.com/ReSwift/ReSwift. But I don’t know if it can help with your scenarios.
09/09/2017 at 11:08
I’ll give 4v architecture a try in next project. Please share any changes you made in architecture
09/09/2017 at 15:52
Thank you! Yep sure, I’m using it in my project so I will update if I find problem, for sure 😀
06/09/2017 at 12:11
Great post, I love seeing new architectural solutions.
I have one question, though: if I would want to push view controllers (in a navigation stack) instead of adding them as children, should I instantiate the router with a UINavigationController and pass it to the view-presenters?
06/09/2017 at 20:08
Hello Calin, Thank you, I’m glad you like the article! Yep, in the view presenter, you can push your child viewcontroller in your navigation controller.
05/09/2017 at 17:31
Good point! We should abstract the anchor object and the popover with two protocols. In this way, the ViewModel works with just an abstract protocol and in the Router you will have an abstract popover object which works with an abstract anchor object. I will create a gist for that if it’s not clear
05/09/2017 at 17:14
But would that not make the view modal have a dependency to UIKit via that reference?
05/09/2017 at 10:40
Hi Marco, thanks a lot for your detailed answer! Will be try apply to my code!
05/09/2017 at 11:38
No worries, good luck and let me know if you have other doubts. Of course, this architecture may not suit your scenarios but there is a solution for everything 😄
05/09/2017 at 06:48
How would you handle a presentation anchored to a certain view (like a popover from a UIBarButtonItem or from view:sourcerect:)?
You also mention that you would use storyboard for the configuration of the navigation items. But what if you do not use a storyboard? Or what if they change on i.e. selecting a user?
05/09/2017 at 08:47
For Interface Builder I meant xib. I usually prefer avoiding storyboards since usually each
View
has its xib file.For the popover anchor, you can send the anchor as parameter in the navigation delegate (the delegate used in
ViewModel
to communicate with theRouter
)04/09/2017 at 10:09
Great article! Very interesting conception! But I rely confused apply your approach (or MVP\MVVN) for case when async load from net need for each cell by each cellForItemAt\cellForRowAt call. Please define “who is who” for this story – User search tweets by mention terms (e.g. #foto), and want to see all images from those tweets in UICollectionViewController. There are conditions – 1) all images load at background queue 2) we have to use NSCache i.e. for each cellForItemAt we are check NSCache if miss then to do async request to Twitter by URLSession. In your terms what layers is responsible to load image, check\save cache, and for cellForItemAt?
04/09/2017 at 17:30
Hey Dmitry, thank you! I’m glad you like the article.
A possible solution would be using an operation queue inside the view model. A cell asks the view model to fetch the image—which creates a new operation. Once the operation is completed, the view model notifies the cell to update with the new data. With this approach, we should care of the lifecycle of the cell cancelling an operation if the cell has been reused for another index path.
Another approach would be injecting a view model with its interactor inside the cell like shown in a lot of MVVM tutorials. It works but view model of the collection should have the responsibility to create also the view model+interactor of each cell. I may be acceptable. It depends on the complexity of the cell. I would prefer keeping as much as possible in the view model of the collection if it doesn’t make bad code and mess.
03/09/2017 at 16:50
Great post.
So if a view controller needs to add some items on navigation bar, then who is responsible to add items, who is responsible to handle actions, and who is responsible to navigate if needed?
03/09/2017 at 22:13
Hey Nelson! Thank you!
I would add the navigation items in the Interface Builder and then the view controller would have the actions of these items which notify the ViewModel of these actions:
If you need to navigate after an item action I would use the approach of injecting a navigation delegate from Router to ViewModel like in the examples.
01/09/2017 at 11:58
Great blog, I will do it in my project….
01/09/2017 at 15:18
Hi Onoshi, thank you. I’m glad you like the architecture.